本日は NEM-sdk という JavaScript のライブラリを使って、XEM を送金するスクリプトを作成していきます。
Contents [hide]
環境
- Node.js v8.11.3
- npm v5.6.0
使用ライブラリはこちらです
→ QuantumMechanics/NEM-sdk
公式ドキュメントはこちらから見れます
→ NEM-sdk | NEM Documentation
NEM-sdk のインストール
npm を使ってインストールを行っていきます。
This file contains bidirectional Unicode text that may be interpreted or compiled differently than what appears below. To review, open the file in an editor that reveals hidden Unicode characters.
Learn more about bidirectional Unicode characters
$ npm install nem-sdk |
NEM-sdk で XEM を送金する
まずはソースコードを見てみてください。
This file contains bidirectional Unicode text that may be interpreted or compiled differently than what appears below. To review, open the file in an editor that reveals hidden Unicode characters.
Learn more about bidirectional Unicode characters
import nem from 'nem-sdk'; | |
// EndpointをTestnetに指定します | |
// 第1引数はTestnet用のデフォルトのノード | |
// 第2引数はデフォルトのポート(7890) | |
const endpoint = nem.model.objects.create('endpoint')(nem.model.nodes.defaultTestnet, nem.model.nodes.defaultPort); | |
async function main() { | |
// TODO: 自分の送金したい先のアドレスに変更してください | |
// 送金先のアドレス | |
const toAddress = 'TAHPGS7CKZAERDU5RGHRCGN4DYGXRLQXO5CPNWIP'; | |
// 送金額 | |
const sendAmount = 1; | |
// 送金の際に指定するメッセージ(空文字でも可) | |
const sendMsg = 'Hello World!'; | |
// TODO: 自分の送金元ウォレットのパスワードを入力してください | |
// 送金元ウォレットのパスワード | |
const password = ''; | |
// TODO: 自分の送金元の秘密鍵を入力してください | |
// 送金元の秘密鍵 | |
const privateKey = ''; | |
// パスワードと秘密鍵をセットにしたオブジェクト | |
const common = nem.model.objects.create('common')(password, privateKey); | |
// Transactionの作成 | |
const transferTransaction = nem.model.objects.create('transferTransaction')(toAddress, sendAmount, sendMsg); | |
// 署名をしてTransactionを送信する準備を完了する | |
const transactionEntity = await nem.model.transactions.prepare('transferTransaction')(common, transferTransaction, nem.model.network.data.testnet.id); | |
console.log('txEntity:', transactionEntity); | |
// Transactionをブロードキャストしてネットワークへ公開する | |
nem.model.transactions.send(common, transactionEntity, endpoint).then(res => { | |
console.log('txRes:', res); | |
}).catch(err => { | |
console.log('txErr:', err); | |
}); | |
} | |
main(); |
追って手順を解説していきます。
大きく以下の3つの手順が存在しています。
トランザクションの作成
まずは発行するトランザクションのオブジェクトを生成します。
トランザクションの作成には以下の3つのパラメータが必要です。
- 送金先アドレス
- 送金額
- メッセージ(Optional)
This file contains bidirectional Unicode text that may be interpreted or compiled differently than what appears below. To review, open the file in an editor that reveals hidden Unicode characters.
Learn more about bidirectional Unicode characters
// 送金先のアドレス | |
const toAddress = 'TAHPGS7CKZAERDU5RGHRCGN4DYGXRLQXO5CPNWIP'; | |
// 送金額 | |
const sendAmount = 1; | |
// 送金の際に指定するメッセージ(空文字でも可) | |
const sendMsg = 'Hello World!'; | |
// Transactionの作成 | |
const transferTransaction = nem.model.objects.create('transferTransaction')(toAddress, sendAmount, sendMsg); |
トランザクションへの署名
続いて作成したトランザクションに署名を行います。
署名で必要なパラメータは以下の3つです。
- common オブジェクト(ウォレットのパスワードと秘密鍵を持ったオブジェクト)
- 作成したトランザクションオブジェクト
- ネットワークID(Mainnet OR Testnet のネットワークID)
This file contains bidirectional Unicode text that may be interpreted or compiled differently than what appears below. To review, open the file in an editor that reveals hidden Unicode characters.
Learn more about bidirectional Unicode characters
// 送金元のパスワード | |
const password = ''; | |
// 送金元の秘密鍵 | |
const privateKey = ''; | |
// パスワードと秘密鍵をセットにしたオブジェクト | |
const common = nem.model.objects.create('common')(password, privateKey); | |
// 署名をしてTransactionを送信する準備を完了する | |
const transactionEntity = await nem.model.transactions.prepare('transferTransaction')(common, transferTransaction, nem.model.network.data.testnet.id); |
トランザクションのブロードキャスト
最後にトランザクションをネットワークへ公開する「ブロードキャスト」を行います。
- common オブジェクト
- 署名をしたトランザクション
- API の Endpoint
This file contains bidirectional Unicode text that may be interpreted or compiled differently than what appears below. To review, open the file in an editor that reveals hidden Unicode characters.
Learn more about bidirectional Unicode characters
// Transactionをブロードキャストしてネットワークへ公開する | |
nem.model.transactions.send(common, transactionEntity, endpoint).then(res => { | |
console.log('txRes:', res); | |
}).catch(err => { | |
console.log('txErr:', err); | |
}); |
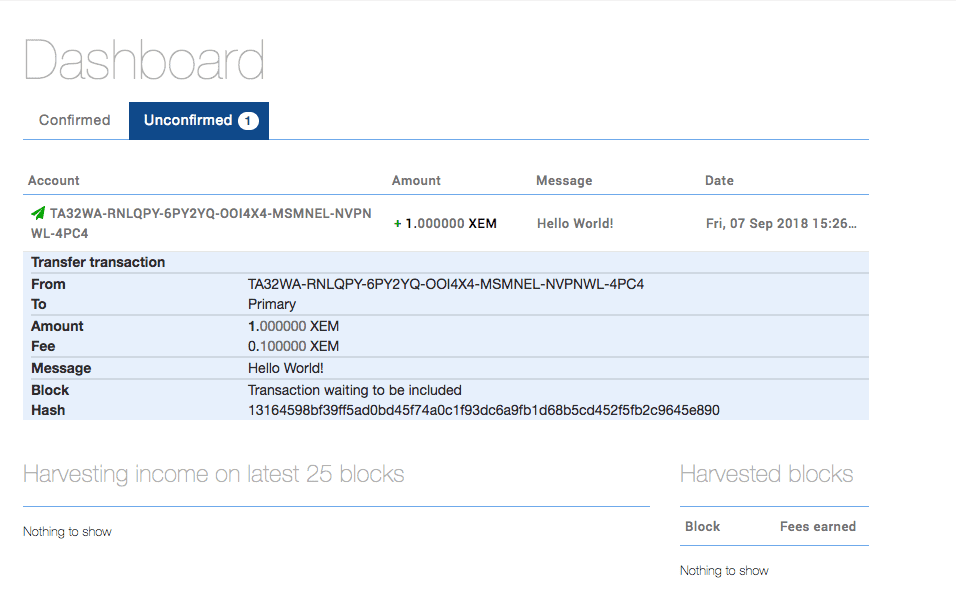
送金に成功したかどうかはウォレットを見れば確認することができます。
これだけで簡単に XEM の送金を行うことができます。
今回は NEM-sdk を用いた XEM の送金方法を解説しました。
次回は同じ NEM-sdk を用いた Mosaic の送金方法をご紹介していこうと思います。